If you have been planning to build your own website from scratch but just didn’t have a clue where to begin, then you have landed in the right place…
There Are Only 4 Steps To Building Your Own Website! So Let’s Start Now!
STEP ONE
Choose What Platform Your Site Is Going To Be Built On
The first thing you need to do is choose what website platform to build your website on. There are many different CMS (content management systems) to choose from and choosing the right platform is a top priority. You don’t want to start building your site on a CMS platform to find out that it’s totally wrong for you and your site. There’s a load of free website building platforms that you could use, but these free websites aren’t great for the long term. You’re restricted to using their own hosting and their own sub-domain ( yourwebsite.freewebsitecompany.com ).
Building out your own a fully functioning and nicely designed website isn’t rocket science. It’s quite easy actually, even for a complete novice who hasn’t had very much experience with computers. But you can get into trouble when you don’t choose the right website building platform.
Some platforms require you to know a little bit of HTML / CSS or other coding languages, so you really need to decide where you are at in terms of website building ability. If you are a beginner then you would be best to choose WordPress.org.
Below is an interactive diagram that shows the most popular website building platforms that the world’s best websites are using in 2018.
WordPress, Drupal Or Joomla. Which One Will It Be?
There are three main content management platforms that most of the world’s websites are run on. WordPress, Drupal, and Joomla.
1. User-Friendly & Newbie Friendly
The WordPress platform is so easy to use. It’s intuitive and if you know how to use standard Microsoft programs such as Word or Excel, then chances are you’ll already know how to publish your own content on the site you’re about to build.
Another great thing about WordPress is that it can be easily customized with plugins, that can pretty much do anything to your site and make it exactly how you want it. You might want just a simple small business website or a complex e-com site with hundreds of products. WP can handle this.
2. Powerful
WordPress is extremely powerful and can run most types of sites. It’s a trusted platform for many of the busiest websites in the world. It can handle pretty much anything.
3. Responsive & Mobile Friendly
With more and more people viewing sites on their phones and other mobile devices, it’s really important to have a site that is responsive to these digital demands. With WordPress, most themes come mobile friendly as standard.
4. It Won’t Cost You A Thing!
WordPress is free. All you have to do is buy your domain and hosting and then you’re up and running before you can say “www.”
5. Plenty Of Lovely People To Help You Out.
WordPress is blessed with a vibrant and helpful community of developers who will be happy to help you out should you get stuck with anything to do with your WordPress site.
STEP TWO
Your Website Needs A Name And A Home.
Get A Domain & Web Hosting To Start The Magic!
Hosting your website on WordPress.com is free. GOOD NEWS!!! And you get a free WordPress domain name. GOOD NEWS!!!
But the hosting service they give you it’s really slow (which will impact your rankings on Google) BAD NEWS!!!
And the free domain name they give you is rubbish, as its a sub-domain and will make you look unprofessional. MORE BAD NEWS!!!
Example: YourWebsiteName.WordPress.com
So let’s look at the better way for your site to get up and running! By spending that little bit more money, your website can have its own hosting which is much faster than any free hosting you can get and your own domain name!
Example: www.YourWebsiteName.com
This means that you will have your very own Web Property and not a site that’s owned and rented to you from WordPress.
Web Hosting And Domain Name Costs
Choose Your Hosting Plan
Typically, hosting will cost you approximately $3 – $6 per month. It’s worth it, really it is! If you’re serious about building your own website then you need your own hosting and domain name.
In most of the websites that I have built, including makeawebsitehub.com, I have used Bluehost for my web hosting.
You can get the basic hosting package for an incredible $2.95 a month + Free domain name, but I recommend the Plus plan for new bloggers, as you get more unlimited features with this deal and you can host more than one website on the account.
The Plus Plan is $5.45 per month, but normally this hosting package would cost you $10.99 per month! You can always start on the basic plan and upgrade to the Plus Plan whenever you want.
Here’s what you get with BlueHost Plus Plan:
A FREE domain name ( worth $15 )Fast, high quality & reliable web hosting provider
Free Site Builder
One-click WordPress Install and 24/7 support.
Unmetered website space
Unmetered bandwidth
Unlimited email accounts
Unmetered email storage
Host unlimited numbers of websites on your account
Free Site Builder
One-click WordPress Install and 24/7 support.
Unmetered website space
Unmetered bandwidth
Unlimited email accounts
Unmetered email storage
Host unlimited numbers of websites on your account
A Quick Recap
If you’re setting up a blog, personal website or business website, you will need both a domain name and hosting package. With the hosting package, you also get unlimited email addresses that are assigned to your domain name!
Example: joebloggs@YourWebsiteName.com
This is super useful as everything is under one roof! No hassle with having to arrange email accounts elsewhere!
If you are looking to create an online store or eCommerce website then read my guide on starting a website with Shopify.
What If I Already Have A Domain Name?
This is no problem at all. If you have a domain and hosting already, feel free to skip this step and move onto Step 3, where I will explain to you how to set up a website.
What Sort Of Domain Name Should I Choose?
Thinking of a decent name for your website can be the toughest thing about building your own website.
In short, your domain should be…
Catchy
Unique
Easy to remember
Quick Guide To Choosing A Domain Name
I have put together some quick tips for thinking up a really good domain name for your site.
What are your Top 10 Keywords
Think of about 10 keywords or terms that describe your website in the best way possible. When you have a good bunch of them you can then start to put them together, mix them up, add prefixes & suffixes to create some really cool domain name ideas.
A Unique Domain Name Is The Way To Go!
Don’t buy a name that will be confused with another website. Be unique, otherwise, it could mean your website falls flat before it has even started. Never buy domains that are simply the plural, hyphenated or misspelled version of an already established domain.
Go for Dot-Com Available Domains or a Top Level Local Domain
There’s no shortage of domain extensions nowadays with .this and .that at every turn. But only a few are really worth having. Dot-Com domains are considered the most valuable and important if you are going to be building a brand. If you want to target a worldwide audience with your site, go for a .com .org or .net, in that order of preference.
Local domains such as .co.uk for UK or .es for Spain are preferable. Avoid local domains like .uk.com
Make it Easy to Remember and Easy For People To Find Your Site.
Although people tend to find your site through a branded search in Google, it’s still important to make your domain easy to spell/type out. If it requires a lot of effort to type correctly, due to trying to spell it, the length or the use of un-memorable words or sounds, you’ve probably kissed goodbye to a good portion of your branding and marketing value
Make it Stick In Peoples’ Heads
Keep your domain name snappy and memorable. Word-of-mouth and search engine prominence are both reliant on easy to remember domain names. You don’t want to have an amazing website that no one can ever remember to tell their friends about because they can’t remember the name of the damn site!
Short Domain Names Go A Long Way!
Short is great! Short is the way to go! It’s easy to type and easy to remember. It gives the possibility of using more characters in the URL in the SERPs and a better look and fit for offline marketing material.
Watch Out For Copyright Infringement
A rare mistake to make but one that isn’t made that often. But if it does it can blow a great domain and a great company out of the water! Check that you’re not infringing on anyone’s copyright with the name of your website. To do this head over to copyright.gov and search before you buy your URL name.
DON’T USE… Hyphens or Numbers
Hyphens and numbers suck! Simple! It makes it really difficult to give your domain name verbally and it fails the easy to remember or type test.
STEP THREE
Setting Up Your WordPress Website & Making It Look Professional!
The boring stuff is nearly done!
So you have purchased your domain name and hosting and now it’s time to make your website function. In just a few minutes your site will come alive.
The first thing you need to do is install WordPress. Sounds hard, but it’s not! Easy as pie!
Installing WordPress
You have two choices. Install with 1-click installation or manual installation.
One click install is very very easy, so would recommend going down this route.
1. One Click Installations To Create A Website With WordPress, Joomla, And Drupal
One-click installation is just that. One click and you’ve installed WordPress. Most web hosts will have the 1-click-installation integrated as standard within their dashboard. This service will have you up and running in a blink of an eye and help you to make your own website with ease!
In your Bluehost account, you’ll find the “1-click-installation” in your account control panel.
If you haven’t signed up to Bluehost and you’re using another web host, then the “1-click-installation” should be in the same sort of location on the site.
These are the steps you need to follow with the “1-click-installation” process. This will be the same or very similar to all of the other major web hosting company websites.
- Log in to your own hosting account/control panel.
- Go to your control panel within your hosting account.
- Click on “1 Click Installs”
- Find the “WordPress” icon and click.
- Choose the domain where you want to install your website.
- Click the “Install Now” button and that’s basically it! You’ll get details of how to access your new WordPress website.
If you need any more help with this, I have created an in-depth WordPress Installation Guide that you can read, print off and follow.
2. Manual Installation
Some web designers/developers like to install WordPress manually to get a custom install of the components they want and don’t want. Others will need to manually install because their web host does not have the “1-click-installation” capability. If this applies to you then you’ll need to have a quick read through of my Manual WordPress Set-Up Guide.
#ProTip: If your web host doesn’t have “1-click-installation” then you should really change your web host!
Click here to open up the Manual Installation Instructions.
Follow these quick and easy steps to install WordPress manually onto your server.
Step 1:
Download WordPress http://wordpress.org/download and save it to your local drive on your computer.
Step 2:
Create a new folder on your desktop or somewhere on your computer and unzip WordPress in that folder.
Step 3:
Find the file named wp-config-sample.php and change the name of it to wp-config.php. You can do this by right clicking the file and selecting the option “rename”.
Step 4:
Open the wp-config.php (with Notepad or Dreamweaver) and fill in the following lines:
define(‘DB_NAME’, ‘database_name_here’); – Database name (if you don’t know it, ask this from your hosting support)
define(‘DB_USER’, ‘username_here’); – Your hosting username
define(‘DB_PASSWORD’, ‘password_here’); – Your hosting password
Once you’ve filled in all the areas noted in the above example, save the file.
Step 5:
Now log into your hosting FTP (download FileZilla for that). The FTP address is usually ftp.yourdomain.com, username and password are the same that you used to register to your host.
Step 6:
If there is any file named “index” – delete it. After that upload all the files from your WordPress folder to your FTP server. I believe you can use “drag n drop” function in FileZilla.
Step 7:
Once you have completed the previous steps, go the URL: yourdomain.com/wp-admin/install.php
This is the page you should see:
Making Your New Website Look Awesome!
Choosing A Theme To Make The Magic Come Alive.
So you’ve purchased your very own domain name and hosting. You’ve installed WordPress on your server, set it up and now you’re ready to venture into the online world with your new website.
It’s time to make this site of yours look professional/awesome/cool, whatever you want it to be. This bit is so easy and we’ll have you up and running in no time!
WordPress automatically installs a very basic new theme to get you started. It looks like this…
The theme is called Twenty Fifteen and is really simple and clean in design, but you’d probably want to find your website’s own identity and go with something that not many people have.
With WordPress, you have access to literally thousands of themes designed by WordPress developers to help you make your site look great.
How To Find A Theme
1) Login to your WordPress Dashboard. You can do this by typing your web address along with /wp-login
Example: http://www.yoursite.com/wp-login
Type in your username and password and then you’re in.
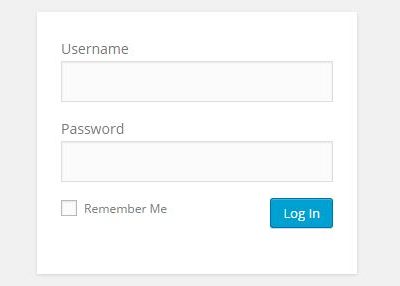
Once you’re logged in, this is the view of your WordPress dashboard.
WordPress DashBoard View
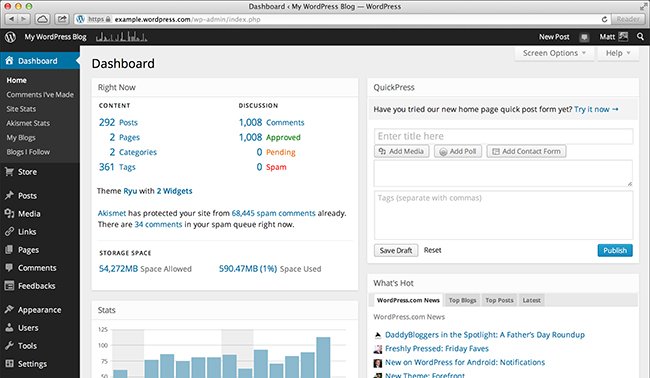
There are a lot of buttons, options, and functions here, which might look a bit complex, but trust me it isn’t. In the next few stages, I will show you how to get started with your theme.
Once you spend just a few minutes exploring the WordPress dashboard, you’ll understand how everything works and become completely fluent with this platform.
2. Getting Started With Free Themes
A “Theme” in simple terms is a collection of files that you can download from WordPress that work together to produce the front end styling of your website.
WordPress themes mainly contain the following:
- The complete design or style of your site
- font design
- color themes
- widget locations
- page layouts (or templates)
- styles for blog posts and blog archives
- additional stylistic details
- menu styles / structure
- In most cases – Responsive design
WordPress has thousands of FREE themes that you can access via the “Appearance” section on the left of the dashboard.
Click “Appearance” then “Themes”. This will take you to the main page for WordPress’ free themes section.
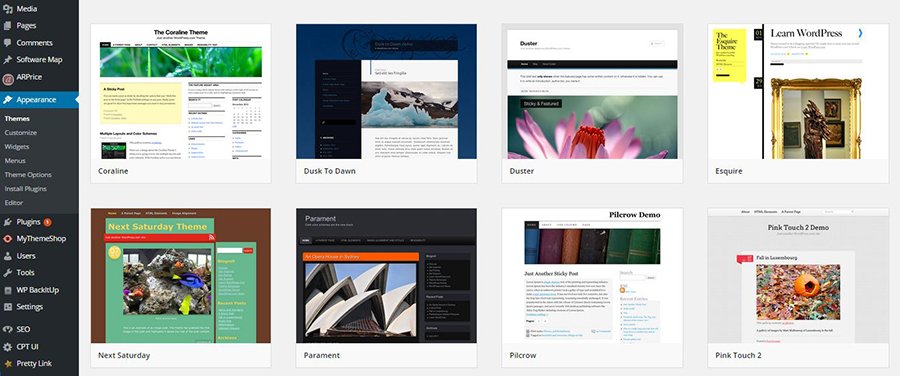
Then click on the “Add New” button which will take you through to where all the free WordPress themes are.
Here you’ll be able to search for themes via a range of really handy filters like: Most popular (Most downloaded + used themes) Featured (Themes chosen by WordPress and featured) Latest Theme (Latest themes to be released on the platform)
Then if you click on “Feature Filter” you then have even more options to help you find the best theme for your site.
3. Premium Themes
If you’re looking for something a bit more professional, more design-led and more robust then premium themes might be what you’re looking for.
Premium themes have many advantages over Free Themes such as reliable code base and superior support if something goes wrong with your site. Also, they just look and function better than the free themes you can pick up on WordPress Theme Directory.
Some premium themes are more like web design software, where you can actually design and build your own theme designs and page layouts/templates. This gives you more flexibility in the type of site you want to build.
I buy most of my premium themes from Theme Forest.
For support, quality of code, constant updates and improvements of premium themes, MyThemeShop and Compete Themes are ideal for the beginner WordPress web builder.
Theme Forest is great for the sheer number and variety of themes available. If you’re looking for a particular type of business site, then you’ll be sure to find it on there.
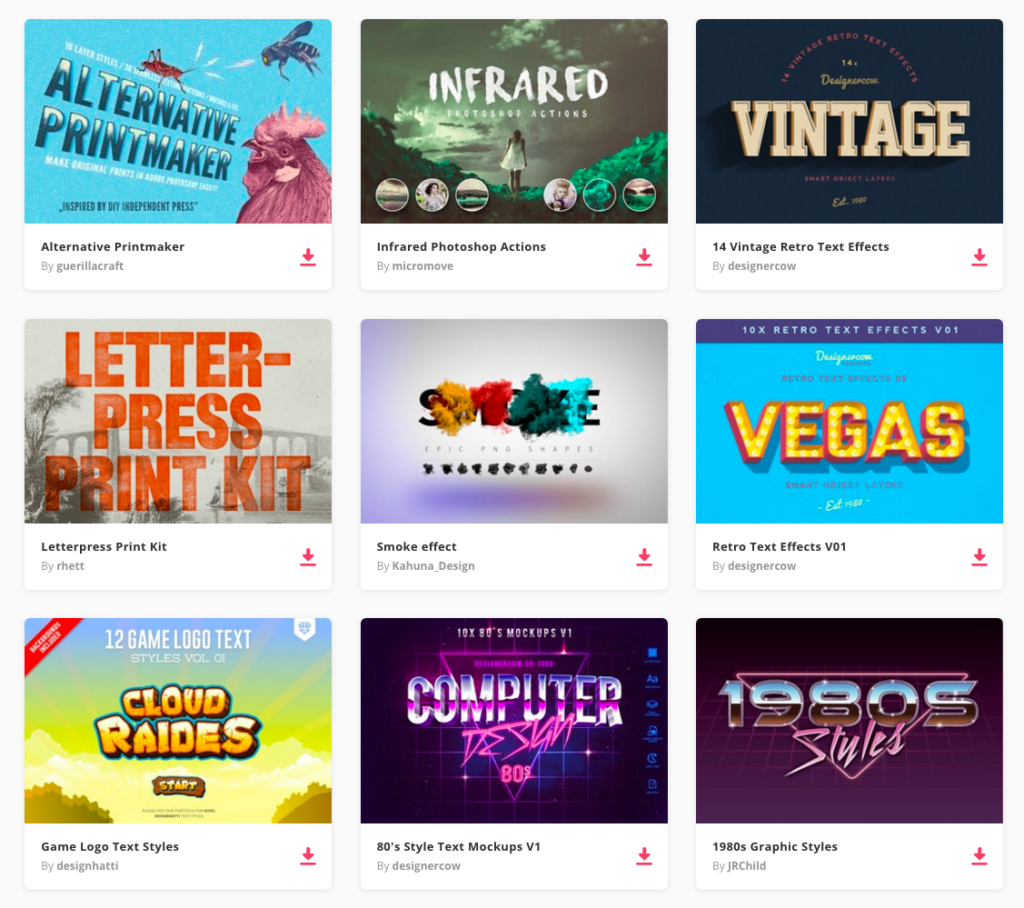
4. Pre-Made Design Elements – Inspiring And Ready-To-Use Stock Photos, CMS Templates, Fonts, And Assets.
To really make your website stand out from the crowd, you may want to get a bit more adventurous and use some additional design elements.
There’s a huge library of goodies for you to use at Envato Elements, which range from ready to use stock images for your blog posts (250,000+ fully licensed stock photos), web templates, fonts, backgrounds and much much more. Elements like these can save you so much time and are all ready for you to use for a single monthly subscription by signing up to Envato Elements.
There’s 30,000+ Fonts, Illustrations, Backgrounds, and over 250,000+ Stock Photo for just $29 per month. There’s also plenty of FREE stuff on there that you can use as well.
How to Install Your New WordPress Theme
So you have the theme you want for your website and you’re ready to install it. This is really simple. Click on the option “Install” then the next step is to click “Activate”
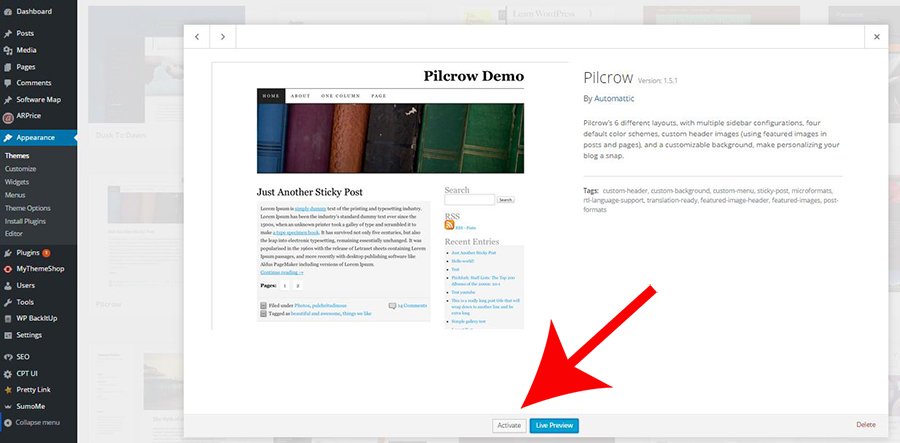
Feel free to change themes as many times as you wish, as it has no effect on the content you already have on there (blog posts, pages, images). Rest assured they are all safe and won’t be deleted or anything nasty like that.
How to Add Content & New Pages To Your New Site.
You are about to see just how easy it is to create a website with WordPress. Below I will be showing you the basics or entry-level tasks that you will need to know in order to add and edit content on your WordPress website.
How to Create A New Page In WordPress
Again, this is such an easy task, anyone can do it. Let’s say you want to create an “About Us” page on your site. All you have to do is…
- In the WordPress Dashboard sidebar look for the section called “Pages” then go down to the option “Add New”.
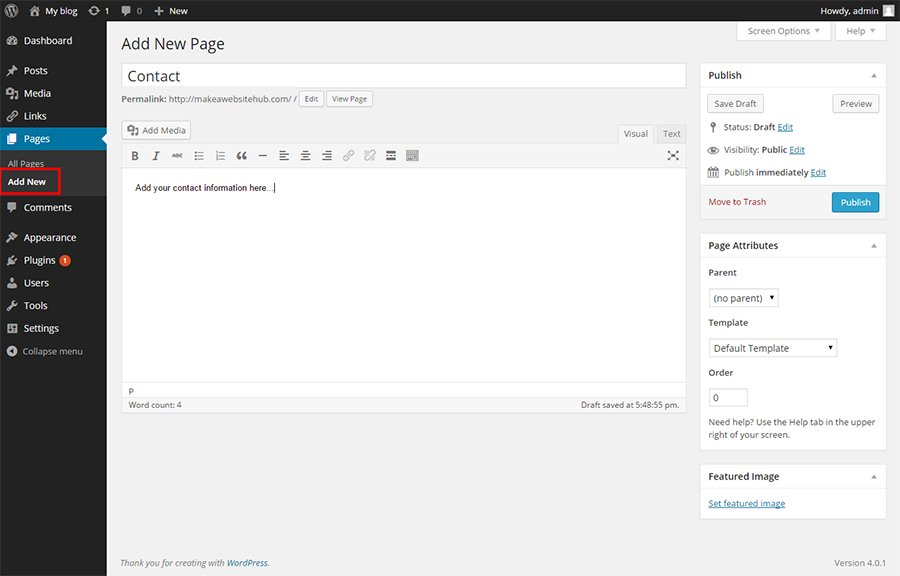
- You then land on a screen which will probably look to you a lot like Microsoft Word. It’s very similar in function too. You can add text, images, video, shortcodes and loads more.
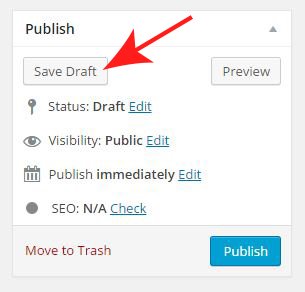
- Once you’ve added your text that you want on the page, click the “Save Draft” button on the right menu bar and then click “Preview” to see what you’ve actually created before you publish it to “Live”
How to Add Pages To Your Menu
To show your new page in the top navigation bar of your WordPress website, you’ll need to do the following 3 easy steps.
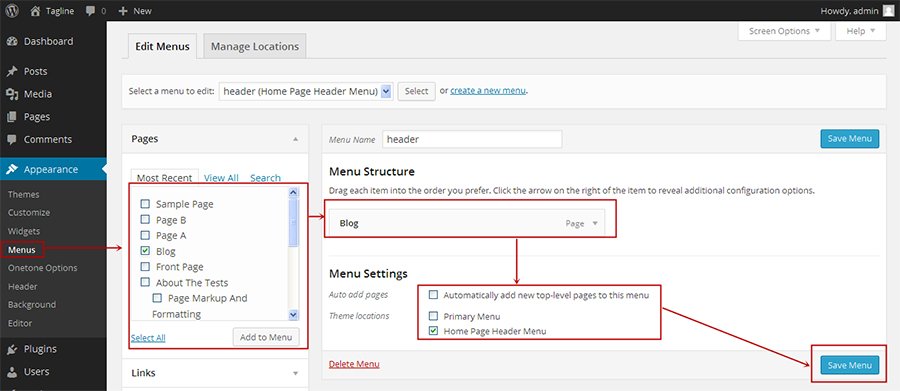
- Save your work. To make sure you don’t lose any of your content that you’ve created on your page, click “Update”
- In the Dashboard sidebar Click “Appearance” and then “Menus”
- The page that you’ve just created will be displayed in the “Pages” box to the left of center. Click on the tick box to the pages you want to be added to your menu, then click “Add to Menu”.In the “Menu Structure” section, you can move the order of the pages around by just clicking and dragging into position.
How to Create Blog Post Pages
“Posts” are web pages where you’ll publish content via your blog. If your website is going to have a blog section, then “Posts” is where you’ll need to go to publish this type of content.
With posts, you can categorize the content really easily within WordPress, which makes it easier for the visitors to your website find your blog posts, especially the older pieces of content.
If you want to include a blog to your website, you can use different categories and posts. Let’s say you want to create a category named “blog”. To do so, simply add it to your menu and start making posts.
Here’s a quick step by step guide on what you need to do:
- To create a new category for your blog, simply go to “Posts -> Categories”
- Another way is to create a blog post by doing this…. “Posts -> Add New”. Then with your completed blog post, you just assign it the right category and you’re ready to publish.
So you’ve created your category for that particular blog post. You can then just add it to the menu so that it’s easily accessed by one and all!
How To Install A WordPress Plugin To Help You Get The Most Out Of The Platform
Plugins are modules or extensions that are installed into the WordPress CMS to increase the capabilities of your website. They add extra features, usability, tools and much more to your site that normally doesn’t come with your WordPress Theme.
Plugins help to add functionality where once you would have had to build the whole site again if you missed anything out.
Plugins can turn a normal website into an online shop in just minutes. Or it can help you get up to speed on your SEO for your site, add a photo gallery, forum and just about everything else!
Installing A Plugin
To install a plugin, head over to the “Plugin” section in the Dashboard menu and then select “Add New”. Use the search function to find the plugin you want for your site.
There are over 30,000 plugins available, so have a good look around and make sure you read the reviews. Not all of them are great, and you should look to see what people have said about them. Also, check to see if the Plugin is still being updated on a regular basis.
Installation is very simple. Just one click and you’re done.
Plugins can turn a normal website into an online shop in just minutes. Or it can help you get up to speed on your SEO for your site, add a photo gallery, forum and just about everything else!
Useful WordPress Plugins
As there are so many different WordPress plugins I’ll give you a few free plugins that I install on every single one of my websites:
- Yoast SEO – if you plan on making sure your new website is set up for success with organic traffic from Google then this is an essential plugin. It also makes easy to format what images and text is used when your web pages are shared on social media too. You can read my guide on setting up Yoast.
- Site Kit By Google – allows you to access information from Google Search Console, Google Analytics, Google AdSense, and PageSpeed Insights from within the WordPress admin panel.
- Contact Form 7 – is one of the most popular and oldest WordPress contact form plugins around. With it, you can create and manage multiple contact forms and easily customize form field
STEP FOUR
Adding Content To Your New WordPress Website
Well done. You’re up and running with your domain name, hosting, WordPress install and theme. Now its time to bring your site to life by creating content for it.
I’m going to keep it real simple and cover the basics, so you can jump straight in with adding content to your site.
Adding pages to your website and editing them
The first page people normally create when they build a website is an “About Us” page. You can see my About page here. It’s also at the top of this page in the main navigation.
To create a page like this you will need to…
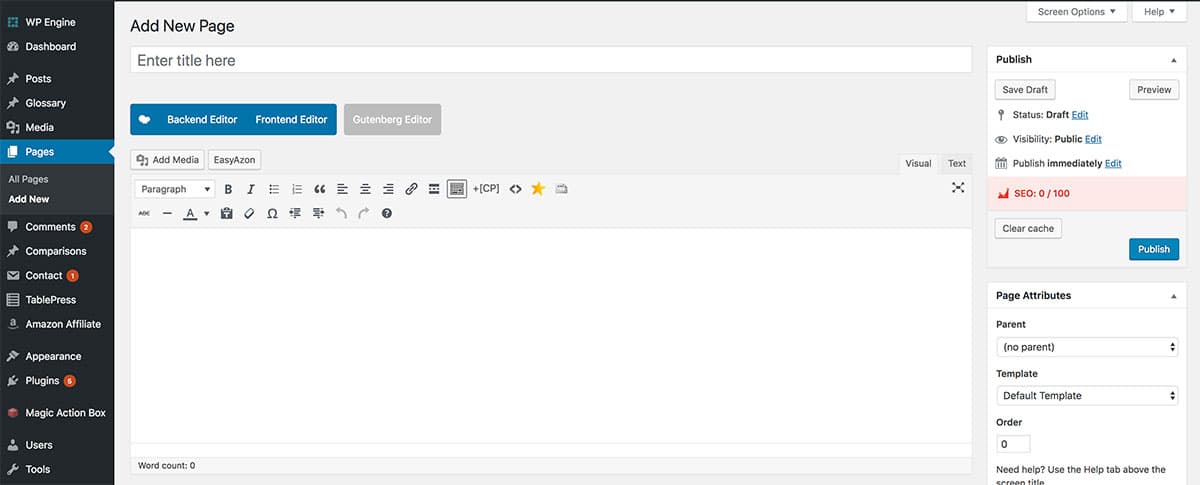
1. Click on the Pages link which you will find on the left hand side of your WordPress dashboard. Click on the “Add New” option underneath.
2. WordPress will then take you to a text editing page, similar to what you would use on Mircrosoft Word or on Gmail.
Adding posts to your website and editing them
Posts are very different to pages. If you have a blog section on your website, then you will need to create your blog content on a post page.
These posts will then appear listed in your blog feed page. If you click on my blog link at the top of this page, you will see all my blog content listed on this feed.
Creating a post
To do this simply hover over the Post link on the left of your WordPress dashboard, then click on “Add New”.
Just like creating a page, you will see the same text editor layout. Write your blog content in the large white space, add the blog title in the smaller white box at the top of the page.
Creating a category for your blog post
When you create a blog post, you should also put it into a category. WordPress gives you the ability to sort your blog posts into categories which helps to organize your blog content into relevant topics, subjects and sections.
It makes your content more discoverable for the user and for search engines.
You can find the categories and tags meta boxes in the right-hand column of your WordPress dashboard, under the “Categories” section.

Adding menus
If you want to add any pages, categories or posts to your main navigation bar, then you will need to create a menu. You can do this by going to the left of your WordPress dashboard, hover over Appearance > then clicking on Menu.
Once you’re on the Menu page, click on the text link “create new menu” which will be near the top of the page.
Give your menu a name and then click on the “Create Menu” button.
Then you can add in the pages you want on that particular menu.
Once you’re finished, press the “Save Menu” button.
You can then assign this menu to your main navigation bar by clicking on the “Manage Locations” tab, which is at the top of the page.

And That’s It! Well Done On Creating Your First Website!
Creating a website can be quite complicated and daunting for someone who has never learned how to code or had any experience with websites. This guide helps people to get online quickly, effectively and without the need of a web developer.
If you have followed all these steps in this guide, then chances are you now have a website! I’ve really enjoyed putting this guide together and I hope it’s helped you produce the website you’ve always wanted.
If I can be of any more help, please feel free to get in touch via the contact form or email me.
Last word from me…
If you love what I do then please share my work with your friends, family, work colleagues and anyone who might be interested in setting up their own website.
Check out our other web resources that will help you in making your own website, as well as our CMS Comparison Infographic. Once you have got your website online be sure to follow my guide on setting up a professional email for your new website.
All the best!

No comments:
Post a Comment